


-
Alignment of views on project sheets
Icon


Related news and articles
Using
The plugin consists of two commands:
Align Views
Alignment of views on project sheets
After launching the command, select a viewport on a sheet whose position will be used as the reference for aligning the remaining views. If a viewport was preselected before launching the command, it will be processed automatically.
Next, a window will open with a list of sheets containing views that can be aligned.
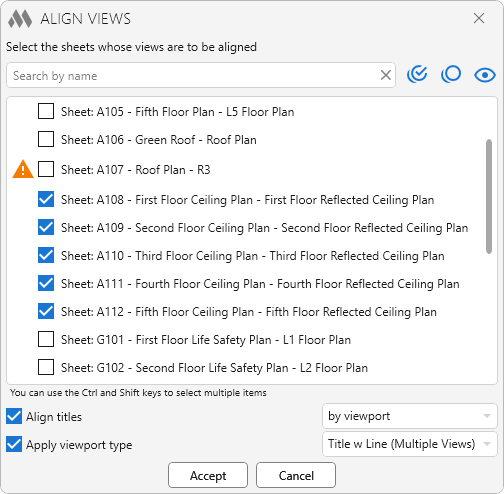
For quick searching, use the search box by name. To its right are buttons for checking all items in the list
 , unchecking all items
  , hiding unchecked items
  , and restoring the full list
  .
.For the command to work correctly, at least one title block on each sheet must be placed at the sheet origin (0,0). If this condition is not met, a warning
.png) is displayed next to the sheet indicating that viewport alignment may not be performed correctly.
is displayed next to the sheet indicating that viewport alignment may not be performed correctly.Only sheets containing suitable views are included in the list. The following criteria are taken into account when searching for suitable views:
- view type
- view direction
- scale
- boundaries of visible elements
- location of elements on the view plane.
If views have the same size but display different areas of the model, they will not be considered suitable for alignment.
Align titles – when this option is enabled, you can configure how the titles of the aligned viewports are aligned:
- by source view – the title on the target sheet will be placed in the same position as on the source view
- by viewport – the title position will be aligned to the top center for all viewports, including the reference viewport.
Apply viewport type – when this option is enabled, you can specify the viewport type to be applied to the aligned viewports.
After selecting the sheets and configuring the settings, click the Accept button. The command will align the views on the selected sheets according to the specified settings.
Align Titles
Alignment of view titles
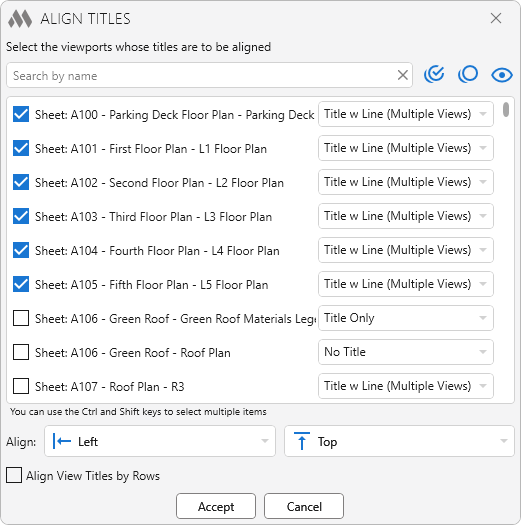
After launching the command, a window opens with a list of viewports in the document. If viewports were preselected, only the selected viewports are included in the list.
For quick searching, use the search box by name. To its right are buttons for checking all items in the list
, unchecking all items , hiding unchecked items , and restoring the full list .Each viewport in the list has a drop-down list containing the viewport types available in the current document. The type can be changed either for each viewport individually or for multiple viewports at the same time by selecting them in the list using the Ctrl and/or Shift keys.
At the bottom of the window, you can configure the horizontal title alignment (Left, Center, Right) and the vertical title alignment (Top, Middle, Bottom).
Align view titles by rows – when this option is enabled, the titles of viewports located approximately on the same horizontal line are vertically aligned into a single row.
After selecting the viewports and configuring the alignment settings, click the Accept button.
-
-
Change history forYear
2026 Year
Revit: Align Views 1.0.0.0 (16.07.2026) Read more
ReleaseRelease. -