


Clash viewer
Several Revit applications are running. Choose one:
| Name | Discount | Total value of individual orders | Total value of corporate orders |
|---|---|---|---|
| Regular user | 0% | ||
| 3% discount | 3% | $84 | $180 |
| 5% discount | 5% | $120 | $360 |
| 7% discount | 7% | $180 | $600 |
| 10% discount | 10% | $300 | $900 |
| 15% discount | 15% | $360 | $1 200 |
| Partners | 30% | ||
| BIM Consulting | 50% | ||
| Super VIP | 100% |
Viewing of clash report in XML format
Icon


Related News and Articles
Using
To load a report, click Open report and select an XML file. The path to the loaded file is displayed next to the button.
The plugin window consists of three sections:
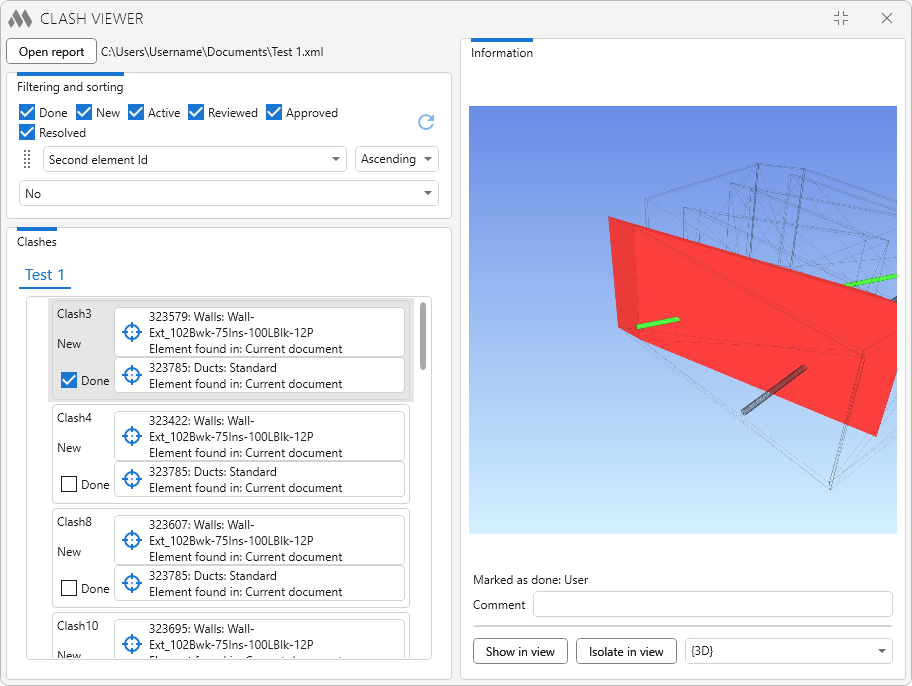
FILTERING AND SORTING
This section allows you to limit the list of displayed clashes and configure their sorting order.
The following checkboxes are used to filter clashes by status:
- New – clashes detected for the first time during the current clash test run in Navisworks.
- Active – previously detected clashes that remain after running the test again.
- Reviewed – clashes marked as reviewed in Navisworks.
- Approved – clashes considered acceptable.
- Resolved – clashes marked as resolved.
The Done checkbox controls whether clashes marked as processed in the plugin are displayed. When the checkbox is cleared, such clashes are hidden regardless of their status. When the checkbox is selected, clashes are displayed both with and without the mark, according to the selected statuses.
Clash statuses are loaded from the XML report. To display changes made in Navisworks, you must generate an updated report and open it in the plugin.
The following sorting criteria are available in the drop-down list:
- No – no sorting.
- Clash name – by the clash name from the report.
- Clash status – by the clash status from the report.
- First element Id / Second element Id – by the ID of the corresponding element involved in the clash.
- First element category / Second element category – by the category of the corresponding element found in the Revit model.
- First element type / Second element type – by the type of the corresponding element found in the Revit model.
The adjacent drop-down list specifies the sorting direction: Ascending or Descending.
CLASHES
This section displays the clash tests from the loaded report and the clashes they contain. Each clash shows its name, status, and the two elements involved.
Below each element's name, the result of searching for it in the current document or linked models is displayed. If the element is not found, a corresponding message is displayed, and the element selection button becomes unavailable.
The  button to the left of the element name allows you to select the element in Revit.
The Done checkbox in a clash entry allows you to mark the clash as processed. The name of the user who set the mark is displayed in the Information section.
The "Done" mark is set independently of the clash status received from Navisworks.
INFORMATION
When a clash is selected, this section displays its image, information about the completion mark, and a user comment.
The image is displayed if it is included in the report and is accessible at the path specified in the report.
When moving the XML report, you must also move the image files, preserving their locations relative to the XML file.
In the Comment field, you can enter or edit a user comment for the selected clash.
At the bottom of the section is a list of views from the current document and buttons for working with the elements involved in the selected clash:
- Show in view – switches to the selected view and crops the view to the elements involved in the clash.
- Isolate in view – switches to the selected view and temporarily isolates the found elements involved in the clash. After the command is executed, the button changes to Restore original view.
When another clash is isolated, the previously isolated elements are replaced by the elements of the newly selected clash.
If only one element involved in the clash is found, isolation is performed for that element. If neither element is found, the Show in view and Isolate in view buttons are unavailable.

 YouTube